
Green House: Almost Ready to List
March 21, 2018
Our first flip is almost ready to list!
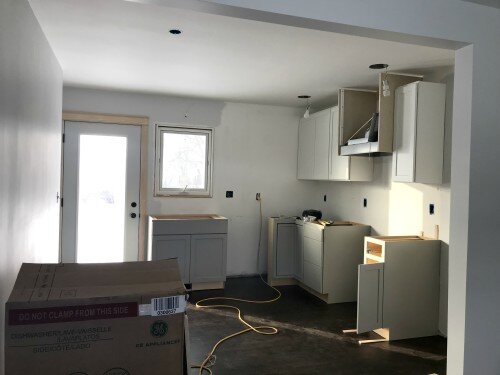
In the last update I showed you the kitchen progress:
Now it looks like this:
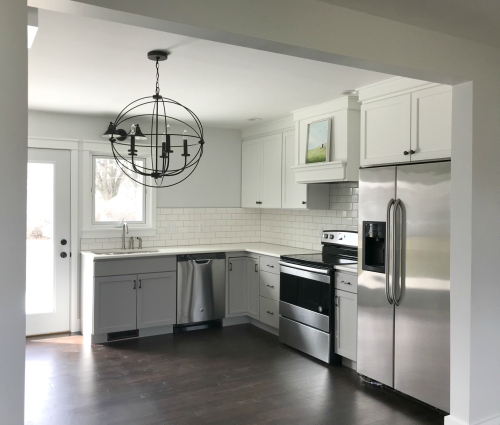
The kitchen just needs a dining table, which will sit under that light, and a few staging details!! Side note: I bought said table almost TWO YEARS ago, along with all the lighting, cabinets and counters…. I was a little ahead of myself there. The table has been sitting -still in the box – in our basement (at our home, not the flip) all that time. During the great flood of 2018, our basement at home flooded. Bruce asked if there was any particular thing to ‘save’ from the incoming water. “SAVE THE TABLE!” was my wild-eyed response. We saved it – it stayed totally dry. Whew! Another side note – not a single drop of water got into the basement of the flip during that flood! We were so thankful!
But back to the kitchen…. I am loving the range hood! I designed the “mantel” (as I like to call it) by playing around with scrap lumber until I got just the right configuration of pieces and I am so happy with how it turned out:

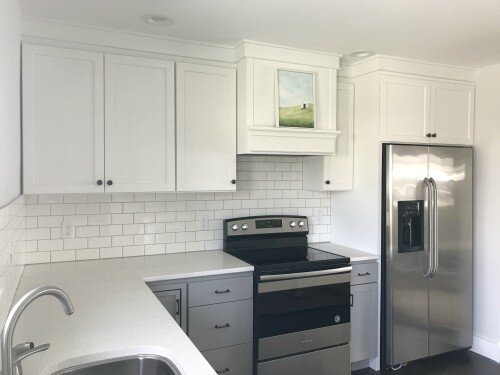
Let me share another detail I’m very happy with that was actually a result of a problem we hadn’t expected. We had planned to do standard crown molding at the top of the cabinets (as you can see in the first picture of the kitchen, there was quite a gap to fill). However, we hadn’t calculated how much the hood surround and fridge surround would protrude into the can light’s space. When we held up some crown, we could immediately see that it would have interfered with the light.
So, what to do?! After some brainstorming, we decided the nicest solution would be to mimic the casework we put on the windows and doors. It provides some architectural interest, ties into the rest of the house, and doesn’t block the can light! Win, win, win! And the new homeowners will get an entirely custom crown designed just for them, which makes me so happy!

But of course the kitchen didn’t get to looking like that picture above until a few other steps had taken place….
Our brother-in-law came over to help Bruce install the quartz countertops (they were too heavy for me to lift!):

Then we installed a backsplash of classic white subway tile. I decided to use a light gray grout to tie into the gray base cabinets.

I don’t know if you can tell in the previous picture, but we decided not to grout the bottom space between the counter and the backsplash. We know how spills can travel, and we just were not comfortable with grout there – both from a clean up and maintenance perspective. So we shoved a 1/8″ thick piece of metal into the space while grouting, then pulled it out later. That left us with this gap:
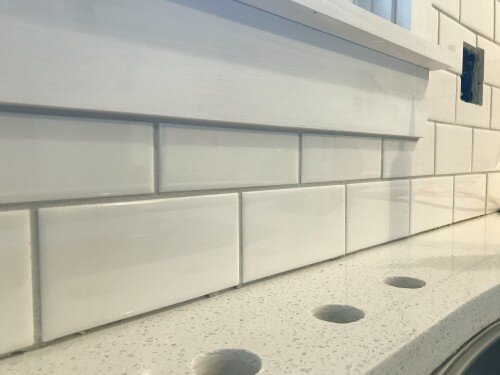
I found a pretty close match to the grout color in a siliconized caulk:

And we were both very happy with the final result. The color of that bottom line is a tiny bit darker, but it feels like we did it ‘right’ for the future homeowner.
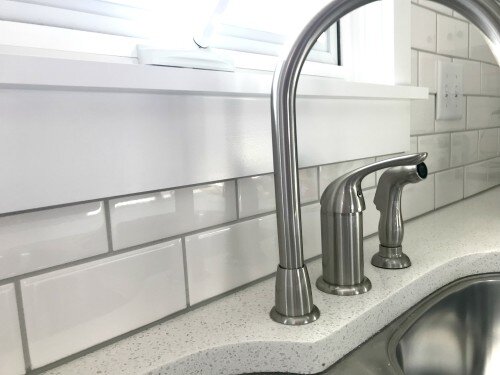
Then we added cabinet hardware. I went with this traditional dark bronze style, and love how it looks against the cabinets!

At that point the kitchen was starting to look pretty good, except for the giant electrical holes:
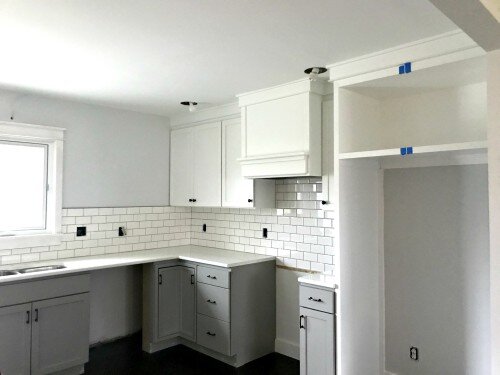
So we called our master electrician back in to finish the final electrical throughout the house.

Every wire, outlet, switch and light fixture is new. Which makes me happy for the future homeowners!
Speaking of light fixtures, here’s a collection of some of the lights in the house:

So pretty!
Another corner that has been done for awhile is the pantry nook:

I have a post coming that explains how I made those shelves and added the wood planking. I plan to stage that area with the microwave and coffee maker and show that trash and recycling can fit below the shelves. The kitchen isn’t huge, but the details like extra outlets and this built in shelving will hopefully help the new homeowner feel they have enough space.
Another detail that I’m enjoying: the custom curtains are up throughout the house!

So what’s left to do? When I posted two months ago the list looked like this:
· Final electrical work needs to be completed (by our licensed electrician)
· Final touch-up painting of all trim and walls
· Doorknobs in bedrooms installed
· Light fixtures will finally get installed in the kitchen, living, and hallway.
· The casework around the fridge needs to be built
· The trim around the kitchen window needs to be installed
· We need to install crown at the top of the cabinets
· The counters, sink, disposal, appliances, hardware and backsplash get installed (is it ok to put that in one bullet point? That’s probably a little optimistic…it’s more like seventy billion bullet points when you break down every detail)
· The whole house needs a good dusting
· The scrap lumber needs to be cleared out of the garage, and a little bit of trim work needs to happen
· The water heater and water softener need to be checked out and turned on
· Final inspection needs to happen
And now the list looks like this:
· The whole house needs a good dusting
· The scrap lumber needs to be cleared out of the garage, and a little bit of trim work needs to happen
· The water heater and water softener need to be checked out and turned on
· Final inspection needs to happen – one week from today!
· AND I’M ADDING:
· final touch ups on stairs to basement
· touch up paint throughout the house
· paint the concrete floor in the basement storage area
· clean windows
· install mailbox and house numbers on pillar
· move out all of our tools
· move in all of the staging furniture
· LIST THIS HOUSE!!!
I am going to share a before/after post once I get the tools cleared out and the house staged, so stay tuned for that!
Or if you can’t wait until then, you can see the first pictures I took of the house in this post.