
Craftsman Bungalow Layout Plans
March 16, 2020
Last fall I introduced our sweet little second flip and since then…radio silence (well, blog silence). What happened?
It’s not that we haven’t been working. The minute we got possession we started demo, and have been consistently (if slowly) making progress since then. And it’s not that I haven’t wanted to share. I started saving photos for you right away, and had my layout plans in place before November. So what happened? The blog didn’t happen, is what happened. The entire blog site got glitchy and messed up and wouldn’t work properly. So I decided to re-build the entire blog in Squarespace. That meant copy/pasting, formatting, linking, archiving…every single old post. It was a job, guys. But it’s done now and you’re currently on the new site! Now that you’re here and I’m here let me fill you in!.
From the minute we walked through the house, I said “this house will be perfect with juuuuust a few layout changes.” Famous last words? Well no, duh, because here I am talking about it, but these layout changes have taken FOREVER. Literally we added NINE new door/opening headers in this little house.
Before we could actually change the layout, though, we needed to get a dumpster on the property. In order to allow the truck room to get around with the dumpster, we had to remove part of the deck (which we wanted to remove anyway). So deck demo came first:

Yep, all that stuff next to the house was left behind…just the tip of the iceberg
Then we brought in the largest dumpster we could fit on the property, and filled it…twice.

What went into the dumpster? Oh, just a kitchen, two bathrooms, piles of junk left behind, all the old plumbing and tons (literal tons) of plaster and lath.

The hall bath in progress. The lath later came off too. And the ceiling. And the floors. And the subfloors.
Once we’d demo-ed the obvious things, we had to pause demo to make some repairs. The floors were caving in, people. Take a look at this bathroom subfloor (the largest dip was right where the toilet used to be):

Yeah, not safe. Throughout the house we cut out a lot of old damaged subfloor and replaced it, and we also completely replaced joists that had been cut through.
THEN we started ripping out plaster and lath in strategic areas where we planned to change the layout. So let’s get into that layout. Here’s the layout of the house when we bought it (not shown is the front living room and dining room):

The main issues here were the kitchen and the master suite.
Let’s start with the kitchen. Notice the kitchen had a small door leading into it - easily fixed by widening the opening. But it also had an opening to the back of the house tucked in the back left corner, requiring the cabinets to be weirdly angled and tight. It also had pretty limited counter space.
To solve those problems we stole the bedroom 2 closet. By doing that we were able to create a space for the fridge across the room, freeing up space for a dishwasher and a lot more counter space. We also changed that cased opening location from the corner to out in the middle (next to the new fridge space) so that the counters could extend fully to the wall. This kitchen will be so much more functional with these changes!
Of course, that meant we also had to build a new closet in bedroom 2, making it a bit smaller.

Here is a view of the kitchen (standing in the dining room) and how it is progressing:

Now on to the master bedroom.

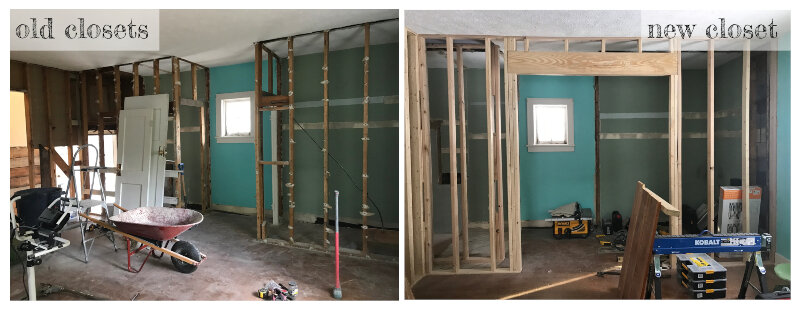
The main problems with this master were that it didn’t have an en suite bathroom, and it didn’t have a walk in closet. Really the closet was barely functional at all, as it was so narrow that you had to walk under your clothes to get to the ones at the back. To solve these problems we made the bedroom smaller. We completely removed the old wall separating the bathroom from the bedroom, and built a new wall. This new master bathroom will have a large walk in shower and a 60” vanity. We also created a main level washer/dryer closet. I felt strongly that laundry should be on the main level, not down at the back of the basement. I guess if a new homeowner doesn’t want to have a stacking washer/dryer, they could use this as a closet or additional pantry space. We also found a great spot for a hall closet/pantry.
Finally, we completely removed the old closet walls and created a new closet wall to create a true walk in closet.
Yes, this all took space from the bedroom, but it created what will be a truly lovely master suite. What do you think - was it the right decision to make the bedroom smaller in order to gain a walk in closet and master bath and main level laundry and pantry?
I don’t have any exciting pictures to show you at this point. It’s all framing, framing and more framing. Here’s one of the master closet that shows where the old framing was and where the new wall is (the opening is so wide because it’s prepped for a pocket door):
One other thing you might have noticed is that we’re changing the stairwell to the basement (cue reminders of the first flip staircase). In this case we needed to enlarge the stairwell opening. It was stupidly small and anyone over 5’4 hit their head going up or down. Do we know how to cut out a floor and rebuild it to be structurally sound? NO. No we don’t. So we went over to Miller Building Supply and talked to their Pro That Knows This Stuff. He calculated load and whatever other things have to be calculated and told us exactly what items to buy and where to place them. Then we just followed his plan:

That new stairwell isn’t done, of course. We’ll be framing in the basement for drywall, which means removing the stairs and moving them to the right. This will give us a chance to build better stairs, which will make the trip down to the new finished family room MUCH more pleasant.
So as you can see, we’ve been busy. We’ve pretty much finished this framing work with the exception of the stairs. In yellow you can see all the walls we’ve messed with - removing plaster and lath, modifying to adjust to the new layout, or completely removing. In blue you can see all the walls we’ve added:

Oh, and I almost forgot! We had new windows installed throughout the home! We used Horizon Windows and Doors and we were SO incredibly impressed with them! They were very kind, professional, thorough, and delivered a beautiful product at a really reasonable price. I encourage you to consider them for your next project (and no, they did not pay me to say that).

We just finished prepping for the electrician and the plumber, and they’re going to come redo ALLLLL the electrical and plumbing in the entire house in the coming weeks! By April we might be…still framing - ha! The basement family room and stairwell are on the agenda once the plumber and electrician are done with their work down there.